Tuesday, 16 October 2012

Groovy "Snow People" - Part 1

Hi. It's been a while since my last post and I have been busy making cards AND getting my Crafting Space organised. I needed more space for storing my stash, so we bought more storage and I have begun to get it all in place. When I am done - hopefully some time this week I'll show you some pictures.

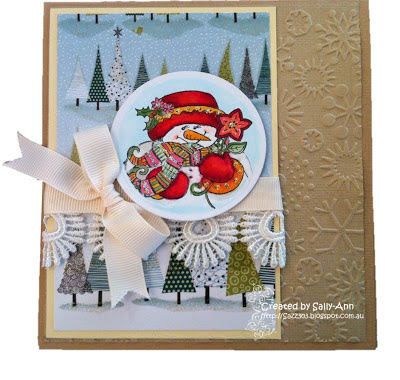
For now I'll show you some cards I have made using a series of stamps from JustRite Stampers. I have included four cards here. They all are similar in structure; I have just tweaked them a bit with different Design Paper. I am starting with my Christmas cards, I'll have to really get going with these so they don't get left 'til the last minute.

So here are my Cards. I'll describe the process in brief then you can see how I varied it.


I began by using two colours from the Kaisercraft Weave card range - Latte and Cookie. I used the Cookie colour for the base of my card as it is the slightly darker colour. I used the Latte colour and the  Cuttlebug "Snowflake" embossing folder to create the first layer.

My first card used a sheet of design paper from a free 6 x 6 paper pad I received with a magazine called Forever Christmas Cards from HOTP.

My second card used a sheet of SEI - Kris Kringle Paper.

My third card used a sheet of design paper from a free 6 x 6 paper pad I received with a magazine called Christmas Collection from Raspberry Road Designs.

My fourth card used a sheet from Kaisercraft Mint Twist 6.5 x 6.5 paper pad.

The "Snow People" are four stamps from JustRite Stampers called "The Groovy Snowman" set (better hurry with these if you want to get them as they are selling them at a greatly reduced price). I coloured them all with Copic pens and cut them out using a Spellbinders Circle Die.

The lace I purchased at Lincraft in Sydney and the ivory coloured ribbon is from Really Reasonable Ribbon - it is the "Grosgrain" type.

The sentiment (I used a different stamp from the set inside the cards) is from Waltzingmouse Stamps called "Compliments of the season".

Here is a more detailed description of the ingredients I used:


There you have it!
I have a few more cards to show you from this set and I'll include them in my next post.
Thanks for stopping by to have a look at my cards. Until next time be safe and take care!


Monday, 1 October 2012

At home with Family and Friends in England

Hi another post from me today. To be honest there was a little bit of a drama with the Photos I will share with you today. Frits took them using his new Galaxy Note 10.1 (he's very proud of it!) and was trying to copy them across to my memory drive, in the process they somehow disappeared. (Read  - gone, trashed, deleted, no more on his Tablet, vamooshed, de nada , nix!!!)  Then he had the insight to check his DropBox on the computer and.... there they were. I'll never say another critical word about Drop Box again!


Here's my lovely friend Linda relaxing at home with her niece Emma (who is getting married in June 2013) and her lovely dog Rory. We stayed with them briefly at Cambridge on our travels in the UK.


This photo is Clare and I in her Dining Room looking at a family video on her i-pad!


 This series of photos are taken of us both up in her Crafting space.


I have just passed to her the Spellbinders Dies that she has waited months for as I had them delivered to me in Australia. She's being very organised and adding them to her Templates Book for reference. We also had not long got up, had breakfast and then we were straight up to the Crafting space!


We spent lots of time chatting and catching up on all our news as well as sharing our crafting goodies.


 OK that's all for now, Thanks for looking at my Blog. It's lovely looking at these photos again. My trip seems to be a long time ago - already!!! Tempus Fugit!!!


Butterflies Card

Well Hello there! I hope you are well.
I am back in Australia after my travels overseas and getting back into the swing of things and the routines of being at home. Our travels once again reminded me that Family and Friends are so important and reconnecting with them again is so special.

We both arrived home with vicious colds which knocked us out of things for a while. At one point we were seriously considering buying shares in a pharmaceutical company as we were going through all sorts of Cold and Flu medications!! Frits and I are both on the mend and each day sees us coughing less and less!

My card today is one I created a while ago and was inspired by Becca Feeken.
Here it is:

I decided to copy the image here at a larger size than normal so you can see the detail a little better.

The base is a sheet of DVWV neutral stak mat card stock, onto which i layered some pinl cardstock from the same pack. The Green patterned paper is from a HOTP Paper Pack (sorry I can't remember which one).

I used lots of Spellbinders Dies:
Small Pinking Circles S4-172 - for the underside of the butterflies.
Beaded Ovals, S4-294 - for the Main sentiment - If nothing ever changed ....
Lacey Ovals, S4-314 - As a mat behind the main sentiment
Scalloped Circles LG, S4-124 - for the centre circle
Standard Circles LG, S4-114 - For the butterflies each side of centre
Classic Scallop - E8-001 and Classic Decorative insert six – E8-014 - for the decorative strip on the left hand side

I used a Martha Stewart Large Monarch Butterfly punch to create the butterflies. The beads for their bodies were a string of 3mm pearls.

I used Justrite Stampers Topsy Turvy Cakes - CR-02230 (for the Birthday Wishes sentiment) and Bottanical Butterflies - CR-02245 for the central butterfly which I coloured using my Prisma Color Pencils; the yellow ribbon is from my stash.

Here's the items I used and the link on them tells you where I purchased them:


I hope you like this card - it was an experiment that I think worked out quite well.
It's good to be back writing my Blog at home. Travelling is Great but being home is Special.
Stay well and Be Safe

Sunday, 2 September 2012

Flowers Feed the Soul - Side Step Card

Hello there Blog Family and Friends. We have just completed part one of our East African work assignment and are very excited about the volume of positive feedback about our work. It is Saturday and a great friend has just kindly paid us a visit at our Hotel and invited us out for lunch with another of our friends tomorrow. We consider ourselves fortunate indeed.

My card today is a particular favourite. I was inspired by Marisa Job who makes some beautiful cards. This one uses the Spellbinders Tea set and matching stamps from Heartfelt creations - take a look:

I made a Side Step Card base with Brown Cardstock from my DCWV Neutral Mat Stack (The instructions for Side Step Cards can be found on Split Coast Stampers). I adjusted the measurements so that my finished card is 8” x 6”.

I used some lovely papers that I had in my stash for a while from Paper Adventures, the plain green paper is called , Artextures - Pulsar and the patterned paper that matches is Artextures - Venus. I used the plain to cover the base card and the patterned paper for my flowers. 

The flowers were made using Heartfelt Tattered Blossoms and Distressed Leaves stamps and matching Dies from Heartfelt Creations and Spellbinders. Then coloured them with Tim Holtz Brushed Corduroy Distressed Stain and Tim Holtz Peeled Paint Distressed Stain. Once assembled using a pearl brad I added a variety of Glitter from Clear snap and used the lovely Glue Gloss as the fixative.

The tea cups are lovely; I used Heartfelt creations China Fragment stamps and Spellbinders Tea Cup dies to cut them out. I coloured them using Copics: E11, E31, G0000, YG63, Y19, YR04, YR24, C3.

The words are from the Flowers feed the Soul, Flourishes “From the Garden” stamp set which is gorgeous. I used JustRite Stampers Nested Oval Medallions Labels Dies - JB-10025 to layer and create my sentiment medallion. Finally I added a bow made from Ribbon in my stash!

For the back of my card I layered white cardstock with more of the brown I had used for the card base.

I punched three flowers using a Carl CP1 Sakura Punch, then added a few self adhesive pearls at their centres.

I also traced around the stacked cups onto plain white cardstock and fussy cut the shape out then sticking it to the back of the staked cups as you could see my Copic colouring on the back of the cups; this just made it look tidy :).


Here are more details about the items I used to make this card:
I hope you liked my card. Stay well and Be safe. Until the next time .......


Related Posts Plugin for WordPress, Blogger...