Monday 28 May 2012

Let a smile be your umbrella

Hello! It's been a few days since my last blog and I have been doing all the design work we need in preparation of our Business Trip to Kenya. It's a long trip this time - we leave Australia on July 24th and return to Australia September 24th. It will be good to see the familiar faces of our customers and also make the trip back home to Australia via the UK to see Clare and for Frits (my very patient husband) and I, to call into Holland to see his family.

Both of us have also managed in the meantime to get a trip to the Hairdressers as we were long overdue for a good cut and sort out! I find when your hair looks and feels nice then you feel really good! When you have a bad hair day well ....  "look out!"  is all I will say!!! Do you find it's the same for you too?

Well my card today is another first. It is a "Side-step" card. I had seen examples of this style of card and often wondered how they were done. I then came across a tutorial by Beate Johns on Split Coast Stampers that helped me enormously.You can find the link HERE.

I will be the first to admit that I followed her directions almost to a Tee and as I happened to also have the set of stamps Beate used, well say no more!


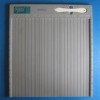
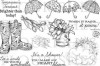
Here is the front of the finished "Side-step" card.
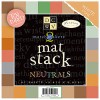
I made the base of the card using Brown DCWV matchmakers Bright 12" x 12" card stock stak.

(By the way I have just learned that DCWV stands for "Die Cuts With a View". Just goes to show you really do learn something new every day.

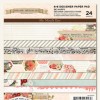
The Design paper I used was MME (My Mind's Eye) 6" x 6" Follow Your Heart - Be Happy  Paper Pad. FYH 143.

I matted this design paper onto smooth white card, then used the faux stitching technique around the edges, both on the front layer as well as the layer on the last fold of the card before sticking to the card base with DST (Double Sided Tape). The "grass" I hand cut from another piece of the MME design paper using the reverse side to back the front patterned side of the paper for a double layered look.


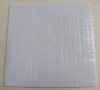
This image gives you a better view of the folds of the "Side-Step" card.

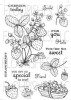
The Stamp Sets I used are from Flourishes - "April Showers" and "Strawberries".
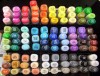
I stamped them on smooth white card using a Memento Rich Cocoa ink Pad. The colouring was done using a range of COPIC sketch pens and Prisma Pencils.

Some of the pieces; once I had fussy cut them, were added to the card using foam pads.


On the back of the card I cut the sentiment and writing panel from smooth white card. The sentiment (and little decorative motif) were cut and embossed using Spellbinders Antique Frames and Accents (S5 - 083). I placed a couple of the separate strawberries on the sentiment and four little gold circle peel off's on the corner of the writing panel.


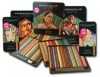
Here are the main ingredients I used to make my Card:


Thank you so much for stopping by and having a read of my Blog. I'd love to get your feedback so leave a comment in the comment box below.


Tuesday 22 May 2012

Father's Day Shaker Card (RRR48 Challenge)


G'day. How are things in your neck of the woods today? It's been a little hectic in the last few days work wise and flexibility required us to be up in Brisbane for a work project at almost the eleventh hour.

The GREAT thing is I discovered that there is a Scrapbooking and Papercraft Expo on at the Brisbane Conference and Exhibition centre between June 9th - 11th. So I have bought some class tickets and we are making a weekend of it.

Frits my (very patient and lovely) husband is going with me, not to attend the Expo, he has decided to spend the day Whale watching including a cruise past all the homes of the wealthy and famous! So we'll both be kept busy doing something we love or will enjoy!

My card today is another experiment and a second entry to the Really Reasonable Ribbon challenge #48.

I have made my first "Shaker" card!
The photo isn't all it could be, you can at least get an idea. The Shaker box has tools made of shrink plastic inside. 


The plastic shaker shell was part of some packaging from some brads I bought. (We crafters never throw anything away!!!)

How is the card Constructed.

I used some mustard yellow cardstock (my usual DCWV Matchmakers Neutral) and cut a piece of card 7.25" x 7". Then I scored .5" from the top of the 7.25" to make a fold (so the finished card is 6.75" x 7").

I then cut a piece of white card stock 6.75" x 7". This would become the back piece of the card at a later stage.


I then cut a piece of MME Design paper 6" x 6.5" and adhered this to the front of my mustard yellow card front. Use a glue not DST as it may hinder the die cutting, which is the next step.

Using my Spellbinders Classic Circles LG (S4 - 114) I then found the size of die that would slip over my plastic shaker shell. Using the chosen die I cut a circle from the card front with the design paper already glued to it.

The next step was to add DST (Double Sided Tape) 1/8" all round the flat edge on the shaker shell on the edge facing upwards. By slipping the card over the shaker box the card front now sticks to the shaker box. So far so good!

Using Spellbinders Blossom, Tags and Accents Die I cut and embossed a piece of matching card stock with the largest die, then again using the Spellbinders Classic Circles LG (S4 - 114) cut out the centre, so this too would sit over the shaker box and provide a nice finish.


Using a Black piece of the RRR May Subscription ribbon I used 1/2" DST to stick this around the sides of the shaker box and on top of this a piece of the RRR Black and White Bakers Twine and tied a little bow.


Now for the content of the shaker box!

I made a drawing of some typical tools found in most Toolboxes. First of all I drew them in pencil on a sheet of paper.
In my stash I have some opaque Shrink plastic, and using a Permanent thin marker and my drawings as a template, created what would be the contents of the shaker box. You could add more items if you wanted to.
I used a couple of COPIC sketch pens to shade the pieces. Then using my heat Gun had fun watching them shrink and harden.


Here is a link to a free download page of my pencil drawing if you'd like to use it. (BTW not for re-sale or commercial use, my copyright applies - thanks for your understanding).


I added the tools to the shaker box and used the circle (cut from the centre of the Blossom, Tags and Accents card stock) to make the initial backing so the pieces didn't fall out.

This picture shows the inside of the card. The top shows the design paper I used to cover the back of the shaker card.

Having now got my shaker in place I folded the 1/2" score mark made earlier (on top of my front card piece of the mustard yellow cardstock) and used this flap to stick (with DST) the white card stock to the card front so that it would now become the back of the card. You can see this clearly in the picture.

I covered the inside with a piece of Crafters Choice, Pastel basics 120 Paper pack on the top and on the bottom a similarly coloured plain mustard yellow design paper. The sentiment reads: "I'm as lucky as can be for the world's best dad belongs to me". I typed this into my PC, printed it on white cardstock and cut it out using Spellbinders Beaded Ovals (S4 - 294) .

Then on the card front I used a Hero Arts Stamp (F2459 Special Things You Do) with Memento Tuxedo Blank ink on a piece of the Mustard yellow cardstock, cut and embossing it with a Spellbinders Labels 25 (S5 - 077) die. Then I drew around the edge of the same die and fussy cut a piece of Green cardstock as a layer piece. I used foam pads to stick the message on the green layer then used DST to add the medallion to the card.

Using the sentiment from the elements on my earlier Fathers Day card  I cut out and layered the sentiment on the same green card stock as the medallion. Two "Francheville" (Spotlight) black gingham button brads finished off the card.

Voila! I certainly surprised myself at how it all came together without so much as a hitch.


Thanks for stopping by and having a read of my blog. I had a lot of fun making this card. I had forgotten the fun that using shrink plastic gives you - it's a bit like that moment when you heat emboss and see the powder melt. Goes to show there's still an inner child in all of us eh? Maybe we need to let it out more?????


Thursday 17 May 2012

RRR Challenge #48 - Father's Day/Masculine with Ribbon or Trim


Hi, how are you and how are things where you are? This post is another exciting milestone for me as it is my first response to a themed challenge. This particular one is from one of my favourite stores - Really Reasonable Ribbon. The theme of the  challenge is: A Father's Day or Masculine card, layout, multi media piece, tag, ATC, hair bow, you name it. So long as  ribbon or lace is used somewhere on the project.

This is a Father's Day Card.

How was the card constructed?


The card base was cut from a 12" x 12" piece of white card stock, the finished size of the card once folded is 6.5" x 6".
I created the black polka dot paper on my computer as well as the sentiments for the card. Having printed the polka dot paper I cut it to size and layered it on some red card stock.
The red and black card stock are from a pack of DCWV matchmakers Bright card stock.


The medallion for the card  was made using Spellbinders Lacy Ovals Die (S4 - 314) and red card stock, then Spellbinders Ovals Large die (S4 - 110) with black card stock.
The image is a Digi stamp from La La Land stamps and coloured with Prisma Color pencils and blended using the Gamsol Technique.


The button was made using my computer generated sentiment which was cut and embossed using Spellbinders Classic Circles  Large (S4 - 114). The red layer was cut with Spellbinders Large Classic Inverted Scallop Circles (S4 - 194).


These two layers of circles were adhered together with Foam pads with two pieces of ribbon taped between these layers.
The red ribbon came from RRR January 2012 ribbon subscription club pack and the Black came from the RRR May 2012  ribbon subscription club pack.


I finished the card with a sentiment across the base of the card printed onto white card stock and pinned to the polka dot layer with two small red brads (from my stash).


Here are the main ingredients that I used to make this card:


Click Me


New Update: For the Free Download page which includes paper and sentiments click on PDF Image


Thanks for looking at my post today. It was fun being challenged to make a card with a specific theme. I might try another one soon. Father's day is celebrated in many countries on the third Sunday of June. Here in Australia it is celebrated on Sunday, 2nd September 2012.


Related Posts Plugin for WordPress, Blogger...