Showing posts with label Prisma Color Pencils. Show all posts

Monday, 1 October 2012

Butterflies Card

Well Hello there! I hope you are well.
I am back in Australia after my travels overseas and getting back into the swing of things and the routines of being at home. Our travels once again reminded me that Family and Friends are so important and reconnecting with them again is so special.

We both arrived home with vicious colds which knocked us out of things for a while. At one point we were seriously considering buying shares in a pharmaceutical company as we were going through all sorts of Cold and Flu medications!! Frits and I are both on the mend and each day sees us coughing less and less!

My card today is one I created a while ago and was inspired by Becca Feeken.
Here it is:

I decided to copy the image here at a larger size than normal so you can see the detail a little better.

The base is a sheet of DVWV neutral stak mat card stock, onto which i layered some pinl cardstock from the same pack. The Green patterned paper is from a HOTP Paper Pack (sorry I can't remember which one).

I used lots of Spellbinders Dies:
Small Pinking Circles S4-172 - for the underside of the butterflies.
Beaded Ovals, S4-294 - for the Main sentiment - If nothing ever changed ....
Lacey Ovals, S4-314 - As a mat behind the main sentiment
Scalloped Circles LG, S4-124 - for the centre circle
Standard Circles LG, S4-114 - For the butterflies each side of centre
Classic Scallop - E8-001 and Classic Decorative insert six – E8-014 - for the decorative strip on the left hand side

I used a Martha Stewart Large Monarch Butterfly punch to create the butterflies. The beads for their bodies were a string of 3mm pearls.

I used Justrite Stampers Topsy Turvy Cakes - CR-02230 (for the Birthday Wishes sentiment) and Bottanical Butterflies - CR-02245 for the central butterfly which I coloured using my Prisma Color Pencils; the yellow ribbon is from my stash.

Here's the items I used and the link on them tells you where I purchased them:


I hope you like this card - it was an experiment that I think worked out quite well.
It's good to be back writing my Blog at home. Travelling is Great but being home is Special.
Stay well and Be Safe

Sunday, 12 August 2012

A Father's Day Card

Hello Blog Friends and Family. Another card from me. Yes I know a second card in as many days. However I can only add a post at the weekends at the moment. How are you? Hope all well with you and yours. The card I have today was an easy one to make and is for Father's Day coming up in September for those of us who live in Australia.

I began by using KaiserCraft Spiced Pumpkin weave card stock as my card base.

Then I placed a sheet of Design Paper from a My Mind's Eye Follow Your Heart - Be amazing 6" x 6" pad. If you look through the pad you'll see the page with this design on and with the hexagon shapes.

Using my computer I matched the colour and drew a few hexagons with a few letters in them which say "Happy Fathers Day". Then I cut them out and stick them over the design of the paper using foam pads.

The sentiment was something I created on my PC which I cut out and added to the front of the card using more foam pads.


The shirt was a stamp which I have had for ages - Funstamps F P70 Gents Shirt and I used a Memento London Fog ink pad  to stamp it with. I stamped the image a few times so that I could cut pieces out to decoupage onto the image. The tie was stamped onto a piece of scrap I had in my stash. I coloured the shirt stripes using my Prisma Clor Pencils.

... and there you have it. Hope you like it. Men's cards are something I really have to work on so the stamp inspired me as well as the MME papers.

Here is more detail about what I used:


Thanks for stopping by to read my Blog. I'll drop by again soon, until then take care and Be Safe.


Friday, 13 July 2012

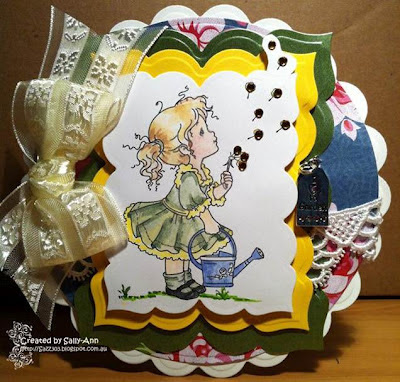
"Wishing on a Dandelion" card

I hope your day is going really well. I am in full swing preparing for our Town's special day. It is called "Made in Dorrigo". The rules are simple. Anything made, grown or manufactured by people in the town can be sold at your own stall. It runs from 08.00am until 2.00pm. This special day is run approximately each quarter and different from the regular Saturday markets held each month. I'll tell you how it goes in my next post!

My card for today I have called "Wishing on a Dandelion". Let me show it to you:

I firstly used my Spellbinders Grand scalloped Circles LF-124. to create my card base. When using this die I made sure not to cut completely through the side edges on my folded piece of white card so that in effect, I created a hinge. I also cut another separate piece using the Grand die, that I used for the very top of my card which I then stuck in its entirety onto the front of the hinged card base.


Next I cut a piece of Kaiser Craft 61/2” x 61/2” Paper Pad – Miss Nelly with my Spellbinders Grand Circles Die LF-114


I added a lovely piece of lace from my stash across this Design Paper which is in between my next two layers of Green and Yellow card. I embossed these pieces of card stock from DCWV using different sized dies from the Spellbinders Grand Labels Twenty Three LF-347.


The image is a Wee Stamps Digi called "Dandelion Girl," which I printed onto white blending card and coloured with my Prisma Color Pencils. Once all coloured up I cut out the image using my Spellbinders Labels Twenty Three S4-347 die. I also used the "cut out of the die technique" so the Dandelion pieces wouldn't be cut off from the rest of the image.

Lastly I added a piece of beautiful yellow ribbon and a gorgeous little metal embellishment which says ...  I "heart" to Garden (apologies no idea where I got this from).

It's a lovely card and one of my Customers already bought this and said her friend (the recipient and also a gardener) was thrilled with it and has now taken the metal embellishment and added it to her Key Ring as a reminder. 

How cool is that!!


More details for the ingredients I used to make my card:


So all the details for this pretty little card are now captured for you. Hope you like it. It was certainly fun to make! I hope you have a great day today.

Thursday, 12 July 2012

Happy Birthday Fun "Tri-shutter" fold card

Hello, how are you?
It's been a very wintery day here today. I s'pose because we live on a mountain the weather has really drawn in. It is winter time here so it kind of goes with the territory (forgive the pun!). If you live across the other side of the globe you may have a warmer time of it. Mind you, you take the weather with you don't you? Meaning it can be really miserable outside but sunny on the inside.

My card today is a fun one. It is a "Tri-shutter" fold card. Let me show you . . .

The basic instructions to make the base card can be found on the Split Coast Stampers website, resources section.

I used a green coloured card-stock from my ever faithful DCWV Neutral Card stock Stack Pack.

Then all the panels were covered with patterned design paper. The selection included:
Crafters Choice Pastel Basics 120 Paper Pack
K& Company 12" x 12" Daisy Printed Embossed Paper item code: 643077 63479.
Once the panels were covered it was a question of adding all the embellishments.


On the front panel:
I used JustRite Stamp set, Topsy Turvy Cakes – CR-02230 and Memento Black Tuxedo ink pad and stamped my images onto X-press it blending card.
I coloured the cake with Prisma Color Pencils and blended the colours using the Gamsol Technique with Stumps and Gamsol. There is a video showing you how to do this, click> HERE.
I then cut and embossed my image using Spellbinders Classic Ovals Large S4-110


On the middle panel:
I used JustRite Stamp set, Botanical Butterflies CR-02245  and Memento Black Tuxedo ink pad and stamped my images onto X-press it blending card. I used my Prisma Color Pencils again and blended them together as before with Stumps and Gamsol.
I cut and embossed this image using Spellbinders Standard Circles LG S4-114.

Additional embellishments used were: October Afternoon SIDEWALKS Chip'n Stick Chipboard Stickers CB830, NitWit Collections – So Berry Precious Label/Tag, Hero Arts Stamps & Sizzix, Die Cut Antique Flowers & Butterflies, Martha Stewart Large Monarch Butterfly, Golden Yellow Wire Butterfly and Dragonfly from Spotlight and a Gold Peel-Off Happy Birthday sentiment.

Here is a more detailed (and visual)  list of the ingredients I used:
InLinkz.com


So there you have it, a "Tri-shutter" fold card. One of my first and I really enjoyed making it. I'm sure I'll make more of these styles of cards now I have tried this particular fold.
Thanks for stopping by.

Related Posts Plugin for WordPress, Blogger...