Sunday 31 March 2013

Popping Up to say Happy Birthday

Hello there. Today is Easter Sunday (as I write this post), so may I wish you and your loved ones Blessings for a Happy Easter. It has been a relaxing day for us and I must admit we couldn't wait for our White Chocolate Easter Bunny so we ate it last night! It was delicious!

I have been really inspired by lots of people and their Pop-Up cards and I decided to have a go myself. Today's  post shows you a pair of Pop-Up cards I have made as well as a supporting video clip. So go grab a cup of your favourite beverage and have a read.


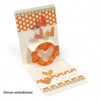
This is the front of the card.
I used some creative memories die cuts at the top and bottom edges of the card, I must say I have had these since 2004 and they came in handy today!

The paper I used is from First Edition 12 x 12 "Isabelle" paper pack. Gorgeous papers and this was just one of the sheets. You'll see more of it when I show you inside the card;. here I just cut around some of the Hexagon shapes as an embellishment.

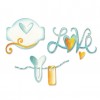
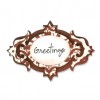
In the centre I used a Karen Burniston (Sizzix) die, which I am coming to absolutely adore. I used DCWV card stock and some shimmer paper that I have had in my stash (these were scraps that I used).
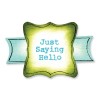
The Happy Birthday sentiment was one from my collection of pre-cut sentiments.


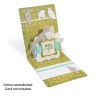
As I used 12 x 12 Papers and Card stock (DCWV) it meant I could make two cards at once, so the two cards I made have similar fronts. On the inside they are different - have a look and see what I mean ....


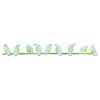
So for the card on the left I used a Label insert and the card on the right I used a Circle insert. I then decorated them both in similar but slightly different ways. Both had the Birds on a Wire added to them (I love this decorative strip from Sizzix!). Both included the Heart Paperclip from the "Love" framelits (see the ingredients listed below).

Isn't the paper pretty? I really like it and it is a beautiful weight.

Here is the video clip for these two cards that I promised to include earlier:


The main ingredients I used for this card:


Thanks for stopping by to read my Blog. Have a Fantastic Easter and enjoy the rest and relaxation.

Saturday 30 March 2013

A Spellbinders Flip Card

Hi there, how’re you today? It has been a couple of days since I last posted anything to my Blog and I have a few cards “in the wings” to show you, so I must make time to post them!
Today is one such card. I was experimenting with my Spellbinders Dies and some inspiration from Christina Griffiths. The card I have to show you is a result of those two things coming together. It is one of Three that I made and I will show them individually on my Blog. You can see all three in the video clip I have attached.
The Burgundy A4 card stock is some I have had for ages; and when I say ages I mean it was in my stash when I was in the UK and that’s a minimum of 8 years ago! It is a really rich Burgundy colour and ideal to contrast with some cream shimmer paper from HOTP.


There are a several dies used to make this card.

Spellbinders Parisian Accents and Motifs – S5-034 and 035.

Spellbinders Foliage S4-328 and Spellbinders Bitty Blossoms S5-086.

Although the camera doesn't pick it up I also used a Spellbinders Flower Delight Grand  Impressabilities 8” x 11” die – GI - 005.


The card is A5 in size.


This photo shows the card as it appears when it is opened. I used a E-Z Metallic Foil Rub-On Transfer (Congratulation Strips Silver)

Also Opal White liquid Pearls, which I notice take on the same hew as the colour of the card stock you place them on, so these turned a very light lilac as they dried.


On the inside and for the writing panel I overlaid two of the round tags from Parisian Accents at the centre of the larger medallion from the Parisian Motifs.


I got the hang of making the flowers from the Bitty Blossoms dies and once glued I sprinkled Glitter on them as well as used some Crystal Stickles.


To finish off the card I added a Purple piece of organza ribbon (from my stash).


The Video clip which shows this and the two others I made using my Spellbinders Dies:


Here are the main ingredients I used to make my card:


Thanks for stopping by today, I'll be sure to post those cards that I have waiting in the wings ...

Monday 25 March 2013

A Lever fold Card

Hello my Blogger Friends (and family), how are things with you today?
All is well with me and mine and we have a day full of beautiful sunshine and temperatures of about 25 degrees (my humble apologies to those of you coping with snow).

Today I have a lever card to show you as well as a video clip of this particular card. I am pretty sure I saw this on a Sizzix blog - or at least I saw the technique and then made my own. I also had just bought a gorgeous pad of "Sweet Treats" 12 x 12 paper from Kaisercraft that I was desperate to play with!

I learned much whilst making this card. Next time I probably should use double sided papers. I folded the 12 x 12 sheets in half (so I wouldn't see any white space) and in retrospect this made the card very stable and perhaps a little heavy.

You cut two sheets of paper and then join them together. Part A is where I used a Spellbinders Circle Die and Only cut a portion of it through this part of the card (to create the flip technique of the lever card).

As an afterthought I added the ribbon at the side to ensure it closed, then place a single pearl from pearl ribbon to cover up how I'd stuck the ribbon on!


This image begins to show you how the lever card works. There was one of the sheets in the "Sweet Treats" 12 x 12 paper from Kaisercraft that I cut up to make the tree fit the circle and you'll see in a minute how I used the rest of the images on that page elsewhere in the card.

You can also begin to see Part B of the card in this photo which is the piece that you glue to Part A.


Here is the entire inside of the card, again I folded over the 12 x 12 paper to make part B and added the remaining elements from the "Tree page" to this pretty sheet.

I also fussy cut some of the flowers and added them to the writing panel on the right hand side of the card.


OK, here you go, you can see the model of the card far better in this photo. The Two parts are glued together just on the far right and left, this leaves the centre (with a little mountain and valley folding) to open out.

I find the best way for me, is to create (on a scrap of paper) the design of the card and then use this as my template for measuring purposes and practising what sticks to what, what should poke out and what folds where!

Here's the video clip I promised:


The main ingredients for my card:


Thanks very much for stopping by today - have a great day

Sunday 24 March 2013

Made In Dorrigo Day - 23rd March 2013 and Cup Cards

Hello to you and hope you are having a Great day/weekend.

I have a couple of pictures to show of my stall at our Made in Dorrigo day .... AND .... a video clip that I am so excited about. I (and Dorrigo) was on the Local NBN News last night and Frits was able to cut out a clip that showed part of my interview so that I can show it to you .... it was very exciting!

I also have some pictures and another video clip of a series of cards I am calling "Time for Tea" - kit cards that I made and that were very popular yesterday and you'll see one of two of them in the Made in Dorrigo pictures.

MADE IN DORRIGO - 23rd March


Here is how I set out my table this time - I use the same cloth and Ribbon as people look out for me as they know what my table looks like.


The sun ( we are glad to say) stayed with us the whole time, it was very bright when I took these pictures at 8.00am.

This photo gives you a closer view of my table.

You might spot some cards that I have shown on my Blog previously or will be coming up as posts shortly.


Couldn't help myself ... my favourite shop in Dorrigo - it even stocks some English sweeties (lollies as we call them here) which remind me of my childhood in England.


Here's the News Clip I was telling you about - it is 1 minute 18 secs long ....


TIME FOR TEA cards:

These are a super kit to make. They are a bit fiddly at first but having made a few they come together very well and very quickly.


I used my Martha Stewart punch on the white card base to add an attractive edge to the cards.

I have a few to show you in different colour schemes and I'll show this example first in detail so you get the idea of how they all look on the inside in their respective colours and themes.


Here is the card opened out. It looks stunning as you open the card, the cup and saucer appears.


On the side of the saucer is a little teaspoon ...


... and the Teabag sits inside the cup - inside are other sentiments that the receiver can open and see.
Just so cute ...


Another colour scheme and different dies to make the edge, this time I used Spellbinders Edgeabilities.


Another colour scheme and more Spellbinders Edgeabilities dies.


More colours and all wrapped up ready for my table.


Here's a video clip showing them in more detail .....


Here are the main ingredients I used to make these cards - other than the kits themselves.


Thanks for stopping by today, I hope you enjoyed today's posting. If you'd like to see anything more leave a comment and let me know

Related Posts Plugin for WordPress, Blogger...