
Hello my Blogger Friends (and family), how are things with you today?
All is well with me and mine and we have a day full of beautiful sunshine and temperatures of about 25 degrees (my humble apologies to those of you coping with snow).
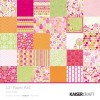
Today I have a lever card to show you as well as a video clip of this particular card. I am pretty sure I saw this on a Sizzix blog - or at least I saw the technique and then made my own. I also had just bought a gorgeous pad of "Sweet Treats" 12 x 12 paper from Kaisercraft that I was desperate to play with!
 I learned much whilst making this card. Next time I probably should use double sided papers. I folded the 12 x 12 sheets in half (so I wouldn't see any white space) and in retrospect this made the card very stable and perhaps a little heavy.
You cut two sheets of paper and then join them together. Part A is where I used a Spellbinders Circle Die and Only cut a portion of it through this part of the card (to create the flip technique of the lever card).
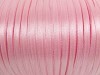
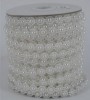
As an afterthought I added the ribbon at the side to ensure it closed, then place a single pearl from pearl ribbon to cover up how I'd stuck the ribbon on!

This image begins to show you how the lever card works. There was one of the sheets in the "Sweet Treats" 12 x 12 paper from Kaisercraft that I cut up to make the tree fit the circle and you'll see in a minute how I used the rest of the images on that page elsewhere in the card.
You can also begin to see Part B of the card in this photo which is the piece that you glue to Part A.

Here is the entire inside of the card, again I folded over the 12 x 12 paper to make part B and added the remaining elements from the "Tree page" to this pretty sheet.
I also fussy cut some of the flowers and added them to the writing panel on the right hand side of the card.

OK, here you go, you can see the model of the card far better in this photo. The Two parts are glued together just on the far right and left, this leaves the centre (with a little mountain and valley folding) to open out.
I find the best way for me, is to create (on a scrap of paper) the design of the card and then use this as my template for measuring purposes and practising what sticks to what, what should poke out and what folds where!
Here's the video clip I promised:
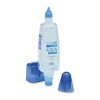
The main ingredients for my card:

Thanks very much for stopping by today - have a great day

All is well with me and mine and we have a day full of beautiful sunshine and temperatures of about 25 degrees (my humble apologies to those of you coping with snow).
Today I have a lever card to show you as well as a video clip of this particular card. I am pretty sure I saw this on a Sizzix blog - or at least I saw the technique and then made my own. I also had just bought a gorgeous pad of "Sweet Treats" 12 x 12 paper from Kaisercraft that I was desperate to play with!

You cut two sheets of paper and then join them together. Part A is where I used a Spellbinders Circle Die and Only cut a portion of it through this part of the card (to create the flip technique of the lever card).
As an afterthought I added the ribbon at the side to ensure it closed, then place a single pearl from pearl ribbon to cover up how I'd stuck the ribbon on!

This image begins to show you how the lever card works. There was one of the sheets in the "Sweet Treats" 12 x 12 paper from Kaisercraft that I cut up to make the tree fit the circle and you'll see in a minute how I used the rest of the images on that page elsewhere in the card.
You can also begin to see Part B of the card in this photo which is the piece that you glue to Part A.

Here is the entire inside of the card, again I folded over the 12 x 12 paper to make part B and added the remaining elements from the "Tree page" to this pretty sheet.
I also fussy cut some of the flowers and added them to the writing panel on the right hand side of the card.

OK, here you go, you can see the model of the card far better in this photo. The Two parts are glued together just on the far right and left, this leaves the centre (with a little mountain and valley folding) to open out.
I find the best way for me, is to create (on a scrap of paper) the design of the card and then use this as my template for measuring purposes and practising what sticks to what, what should poke out and what folds where!
Here's the video clip I promised:
The main ingredients for my card:
Thanks very much for stopping by today - have a great day
No comments:
Post a Comment
Hello, if you have a minute I would love to hear from you and read your comments. Just fill out the box designed to help you do this. I really look forward to reading every comment; so please leave a few words when you drop by - Thanks, I really love and appreciate it.
Sally-Ann (Sazz)